With the popularity of Apple iPhone, iPad, and iPod, most Apple fans and audiophiles like to listen to the high-quality music on the loved Apple device and iTunes, thus we always need to download and import other music to iTunes.
Can iTunes play WAV files?
WAV is an audio file format that was developed by Microsoft, which is so wide spread today that it is called a standard PC audio file format. And iTunes supports five different audio formats. You can see them by choosing iTunes > Preferences, clicking the General tab, then clicking Import Settings. iTunes now can read, write and convert between MP3, AIFF, WAV, MPEG-4, AAC and Apple Lossless (.m4a).
Though iTunes announced to support WAV audio file, you will be disappointed when adding WAV to iTunes, and and you may find the web is swarmed with similar queries like "Why iTunes won't play WAV somtimetimes" or "How to add WAV to iTunes". Continue reading this article you will get two effective solutions to convert WAV audio to iTunes for sycing/playing as below.

Solution 1 - Use a third-party video converter
If you want to import WAV to iTunes with the quality of WAV audio intact, you can convert WAV to Apple's friendly lossless m4a. If you prefer to smaller file size rather than quality, you can convert WAV to a more common format like MP3 to gain more compression rate and smaller file size. Whether you want to convert WAV to M4A or MP3, Dimo Video Converter Ultimate for Mac can help you do the job.
Key Features of the Utility:
* Convert iTunes unrecognized WAV to M4A, AIFF, AAC, WAV, MP3, etc to help you open WAV in iTunes (12.5.5);
* It supports converting many uncommon audio formats in order to help other Apple users to play them in iTunes, QuickTime, iPhone, iPad, iPod, Final Cut Pro, etc;
* In addition to WAV, it enables you convert iTunes and other Apple devices and players incompatible OPUS, AC3, OGG, OGA, WMA, XWM, 3GA, M4A, M4B, MKA, RA, RAM, APE, AU, AUD, AIFC, CAF, MPC, QCP, VOC, VOX, GSM, etc or video files like WMV, AVI, MP4, MKV to MP3, AIFF, WAV, etc for playback;
* Besides working as a super helper for Apple users, it also allows you to convert audio files so that you can play them in Android, BlackBerry, Xbox serious, PlayStation serious and so on;
* You can optimize WAV and other audio files before converting them or importing them into popular devices and players with built-in audio editing tools.
* For Windows PC users, here is the windows version which is compatible with Windows 10/8.1/8/7/Vista/XP
Free Download Dimo Video Converter Ultimate for Mac/Win:


Other Download:
- Cnet Download: http://download.cnet.com/Dimo-Video-Converter-Ultimate/3000-2194_4-77376153.html
- Soft32 Download: http://dimo-video-converter-ultimate-for-mac.soft32.com/
- Top4download: http://www.top4download.com/dimo-video-converter-ultimate-for-mac/digazgge.html
- handyarchive Download: http://www.handyarchive.com/Audio/Rippers-Encoders/176347-Dimo-Video-Converter-Ultimate-for-Mac.html
- filetransit Download: http://www.filetransit.com/screenshot.php?id=450316
- filedudes Download: http://www.filedudes.com/Dimo_Video_Converter_Ultimate_for_Mac-download-226665.html
- directoryofshareware Download: http://www.directoryofshareware.com/preview/dimo_video_converter_ultimate_for_mac/
- xentrik Download: http://www.xentrik.net/software/dimo_video_converter_ultimate_for_mac.html
- filebuzz Download: http://www.filebuzz.com/fileinfo/470884/Dimo_Video_Converter_Ultimate_for_Mac.html
- fileflash Download: http://146210.7.fileflash.com/download/
- yankeedownload Download: http://www.yankeedownload.com/software/dimo-video-converter-ultimate-for-mac-lnpol.html
- dodownload Download: http://www.dodownload.com/audio/grabber-converter/dimo-video-converter-ultimate-for-mac.html
- Antivire Download: http://www.antivire.com/Downloads/Audio-Multimedia/Rippers-Converters/Dimo-Video-Converter-Ultimate-for_46665.html
Step 1 Add WAV files
After downloading, you can install and run the WAV to iTunes Converter. To load WAV files to this app, you can go to "Add File" from the main menu to browse your hard disk to select the WAV audio files. Also, you can directly drag one or several WAV files to the software, it won't take you too long until. If you want to be more cautious, you can always make a duplicate folder of your master copies. It is always a good practice to have a back-up.
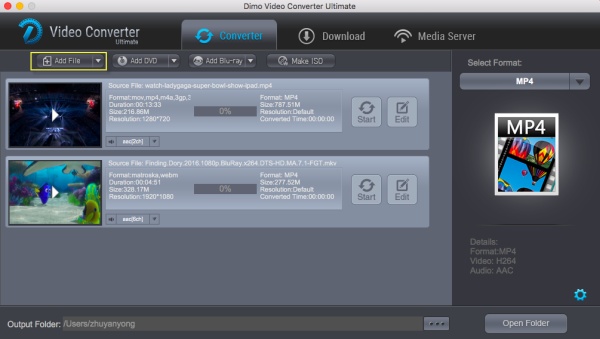
Step 2 Set output format
Click "Select Format" drop-down button to choose "MP3", "AIFF" or etc as output formats from "Format > Audio" category. If you care about the quality of the output file, just choose "WAV" or "M4A" as output format from "Format > Audio" category. An MP3 tends to offer a higher room of flexibility in the situation that you might want to share those audios with family or friends that happen to use non-Apple devices, whereas an M4A might still be subjected to the DRM.
At this time, you can also set output directory, so you can get the output files as soon as the conversion is finished. To do this, you need to click "..." of the program window to specify the output folder.
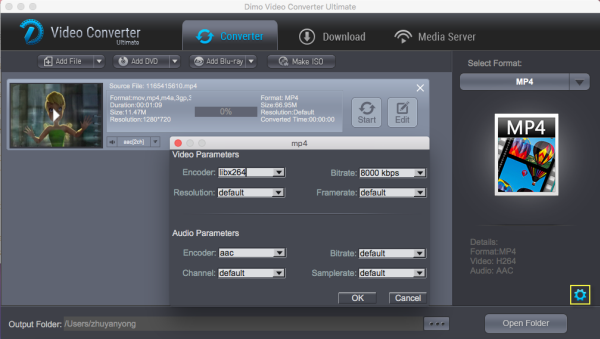
Step 3 Edit before converting WAV files to iTunes (Optional)
Simply skip this step if you don't want to edit your audio files. Or else, click on the "Edit" button on the right-hand side of the uploaded audio file to access the editing screen.
Step 4 Modify Audio Parameters (Optional)
Before starting conversion, advanced users are allowed to modify audio parameters. Open Settings Window, you can change audio bitrate, encoder, audio channel and sample rate.
Step 5 End the conversion
In the end, just click the conspicuous "Start" button to perform WAV iTunes conversion efficiently on Mac/Windows PC. The process will take you some time, which mainly depends on the size of all imported WAV files and the performance of your computer.
Now, you can really play WAV on iTunes, just drag and drop the output files (.mp3 files) from the output folder to iTunes music library. You can also sync WAV to iPhone 7 Plus, iPhone 7, iPhone 6S/6S Plus/6/6 Plus/SE/5S/5C, iPad Air 2, iPad Mini 4/3, iPod Touch 6, etc. via iTunes. In this way, you'll find you can import the WAV files to iTunes library and even sync to Apple devices without any limitation.
Tip: For new iTunes 12.5.5, there's little difference with the previous version. You can learn how to add audio files to iTunes in detail.
1. Start iTunes 12.5.5.
2. Click File > Add File to Library.
3. Click View and select Music, then your music library will be presented.
4. Click Songs and now you can find your transferred MP3 audio. In this interface, you can also directly drag and drop local audio files.
The following is a step by step guide that tells you how to transfer the converted WAV file into Apple TV via iTunes.
Step 1 Import the converted WAV files into iTunes.
Step 2 Make your Apple TV discoverable by your iTunes on computer. Go to your Apple TV to open "Settings" -> "Computers"- > "Connect to iTunes".
Step 3 Find your Apple TV in iTunes. Open iTunes on your computer, go to menu -> "Preferences", click "Apple TV" and make sure "Look for Apple TVs" is selected. Close Preferences window.
Step 4 Now, you will see your Apple TV in the main window. Select it and enter the passcode.
Step 5 In the last step, go to "Summary" and select "Automatic Sync" or "Custom Sync" to finish transferring WAV to Apple TV.
Solution 2– Use iTunes
In iTunes music library, iTunes could create a copy of a song in a new format, with the original file existing in original format. Also, it could import external songs and convert them to a new format at the same time, which creates a converted copy of file in iTunes music library.
* Convert formats for songs inside iTunes:
1. Open iTunes Preferences.
Windows: Choose Edit > Preferences.
Mac: Choose iTunes > Preferences.
2. Click "General > Importing Settings…" button to invoke the "Importing Settings" window, on which click the "Import Using" drop-down button to choose the encoding format you want to convert the song to (e.g. select WAV Encoder if you want to convert iTunes songs to WAV format). Then click OK button.
3. Select one or more songs in iTunes music library, then from the File > Create New Version menu, choose the versions you want to get (the menu item changes to show what's selected in your Importing preferences).
* Convert external songs to iTunes via importing:
To convert all the songs in a folder or on a disk to iTunes, hold down the Option key (Mac) or Shift key (Windows) and choose "File > Create New Version > Convert [import preference setting]". The Import preference setting will match what you chose in step 2 mentioned above. iTunes will prompt you for the location of the folder or disk you want to import and convert. All the songs in the folder or on the disk will be converted.
Free Download or Purchase Dimo Video Converter Ultimate for Mac/Win:


Need the lifetime version to work on 2-4 Macs so that your friends and family can instantly broaden their entertainment options? Please refer to the family license here.

Kindly Note:
The price of Dimo Video Converter Ultimate for Mac is divided into 1 Year Subscription, Lifetime/Family/Business License: $43.95/Year; $45.95/lifetime license; $95.95/family license(2-4 Macs); $189.95/business pack(5-8 Macs). Get your needed one at purchase page.
Related Software:
BDmate (Mac/Win)
Lossless backup Blu-ray to MKV with all audio and subtitle tracks; Rip Blu-ray to multi-track MP4; Convert Blu-ray to almost all popular video/audio formats and devices; Copy Blu-ray to ISO/M2TS; Share digitized Blu-ray wirelessly.
DVDmate (Mac/Win)
A professional DVD ripping and editing tool with strong ability to remove DVD protection, transcode DVD to any video and audio format, and edit DVD to create personal movie.
Videomate (Mac/Win)
An all-around video converter software program that enables you to convert various video and audio files to formats that are supported by most multimedia devices.
8K Player (Mac/Win)
A mixture of free HD/4K video player, music player, Blu-ray/DVD player, video recorder and gif maker.
Contact us or leave a message at Facebook if you have any issues.
Related Articles:
- Downsize Yuneec Typhoon H 4K to 1080p for working
- How to Play QuickTime MOV on Windows Media Player
- Top 3 AnyDVD Alternatives for Blu-ray ripping on Windows 10
- Rip and Copy Blu-ray to QNAP TS-453 Pro NAS for TV watching
- Guide to save MKVCinemas downloaded MKV Movies into MP4
- Best MPEG Streamclip alternative for macos Sierra to rewrap video